The Basics of Crochet
Learning how to crochet is the same as when you learning anything new you have to start with The Basics! In this lesson you’ll learn everything you need to know before making your first stitch.
- Supplies Needed
- Crochet Hooks
- Yarn
- Accessories
- How to Read Yarn Labels
- Terminology
- How to Read Crochet Patterns
- Tension and Gauge
- Right and Wrong Side of a crochet piece
*This post contains affiliate links, which means I receive a small commission, at no extra cost to you, if you make a purchase using this link.
Supplies Needed to Learn How to Crochet
The great thing about crochet is you only need a few supplies to get started. Some yarn, a crochet hook, scissors, a yarn needle, and a tape measure.
Take a look at some of My Favorite Supplies.
Crochet Hooks
Crochet Hooks are available in many sizes, shapes, and made from a variety of materials. Hooks can be made of metal, wood, or plastic. There are no right or wrong hooks. The most important thing is that the hook feels comfortable in your hand. I recommend trying a variety of crochet hooks to find what is best for you.
Parts of Crochet Hook
Although crochet hooks come in several shapes and sizes, they all have the same parts.
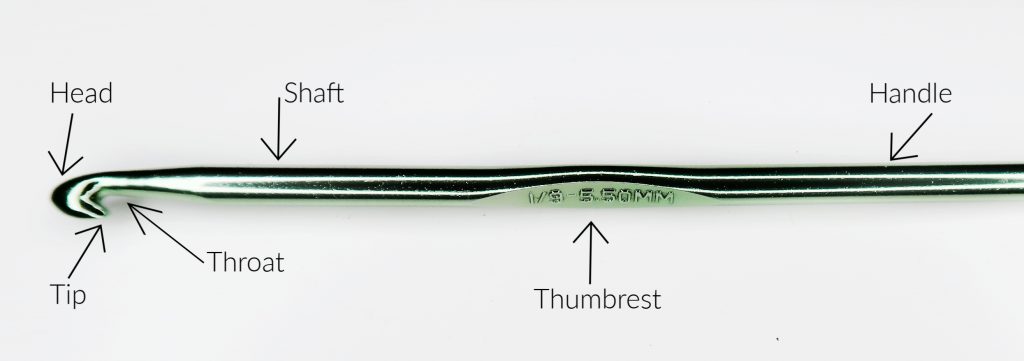
Head: The head of the hook is the part that inserts between the strands of yarn.
Tip: The tip is the pointed part of the head.
Throat: The throat does most of the work; it catches the yarn and pulls loops through stitches.
Shaft: The shaft holds your working loops and determines the stitch size.
Thumb Rest: The thumb rest, is as it sounds, a place to rest your thumb and make it easier to hold. Not all Crochet hooks have a thumb rest. Some hook handles enlarge where the thumb rest would be. These hooks (Ergonomic Hooks) are great for people with hand pain – such as arthritis and carpal tunnel syndrome.
Handle: The handle helps to balance the hook while you crochet.
Tapered and Inline Crochet Hooks
There are two basic shapes for hooks – tapered and inline. The difference between the two is the shape of the throat. One is not better than the other; it comes down to preference. Again, I recommend trying both and see which you prefer working with the best.
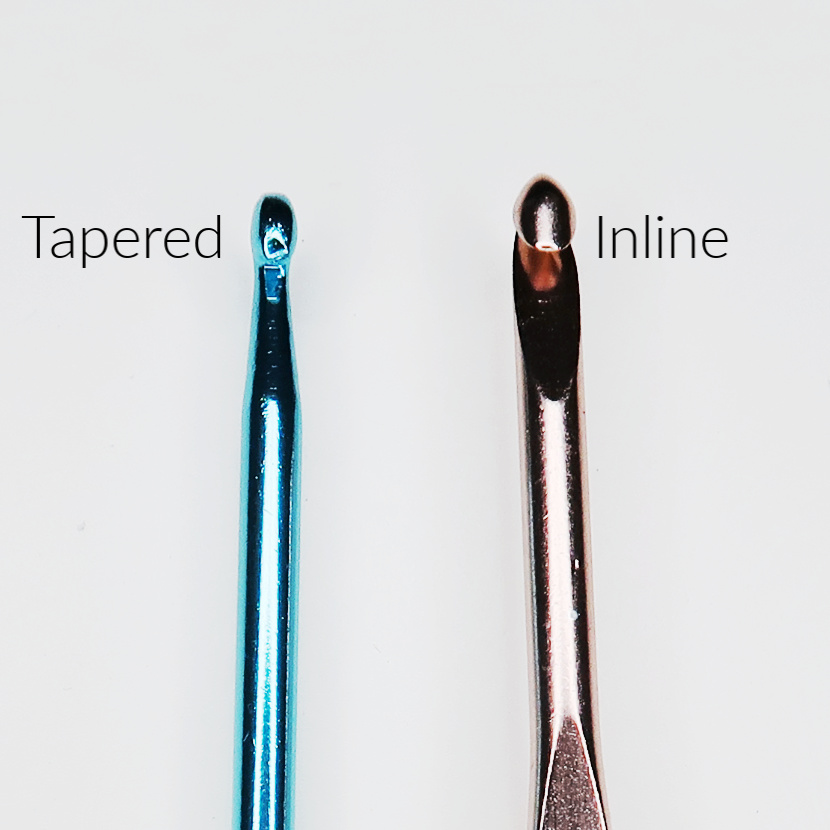
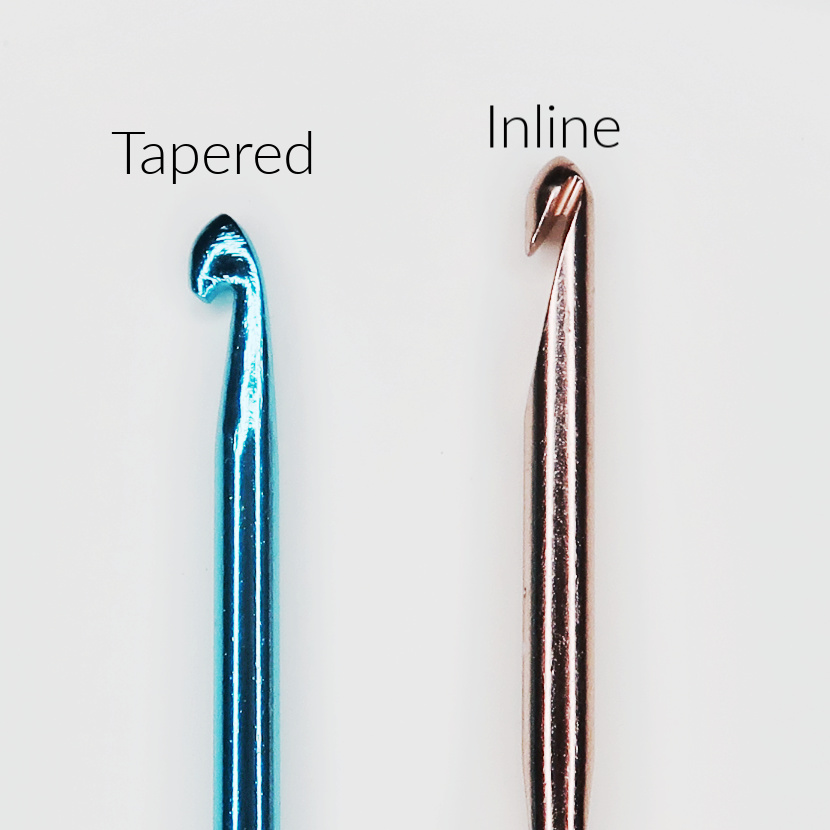
Tapered Hooks
Its throat becomes narrow from the shaft towards the tip, and the cut under the tip is tapered. The tip is usually more rounded.
A common tapered brand of hooks is Boye.
Inline Hooks
The throat is the same width as the shaft, and a straight cut forms the chin. The tip on an inline hook is more pointed.
A common inline brand of hooks is Susan Bates.
Hook Sizes
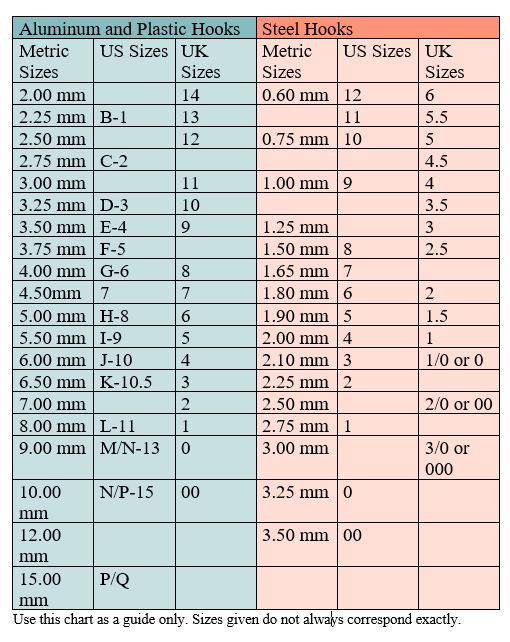
What is the Best Size Crochet Hook for Beginners?
I have seen hook sizes G, H, and I all recommend as the best for beginners to use. I do not think there is one size hook for beginners. Instead, I recommend that you use the hook size suggested on the yarn label. Yup, right there on the label, it tells you the best size hook! Using the hook that is on the label will also help you with gauge and tension.
I recommend starting with an affordable set of hooks, so you have various sizes to work with.
Yarn
Like crochet hooks, yarn comes in a variety of fibers and sizes. There are so many options!
Yarn Fibers
Animal Fibers:
- Wool
- Cashmere
- Lama
- Alpaca
- Mohair
- Silk
Plant Fibers:
- Cotton
- Bamboo
- Linen
Synthetic Fibers:
- Acrylic
- Polyester
- Nylon
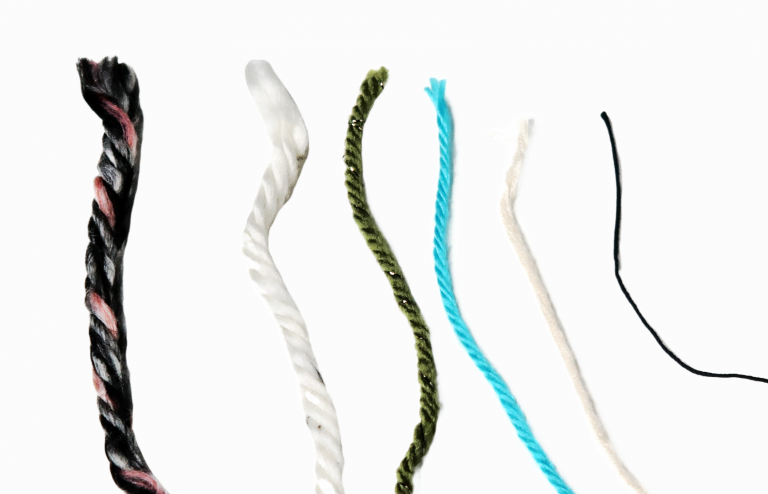
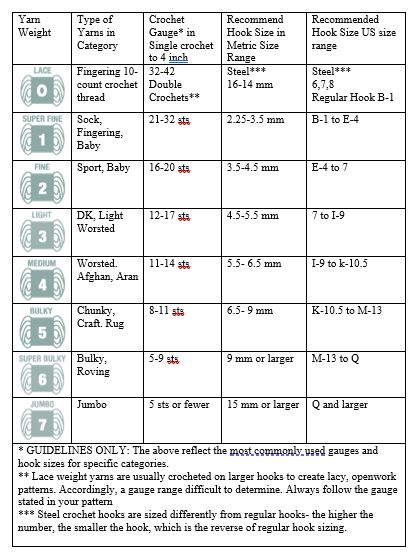
Yarn Weight
Yarn weight determines the thickness of the yarn. The thinnest being Lace (0), and the thickest is Jumbo (7).
What Is the best yarn for crochet beginners?
You do not want to work with anything too thin or thick. Avoid crazy textured, dark, and multi-color yarns, it makes it difficult to see your stitches. I suggest a medium (4) weight, acrylic yarn in a light solid color.
Reading a Yarn Label
Everything you need to know about the yarn you purchase is on the label. Today we will look at Lion Brand Yarn – Hometown USA yarn.
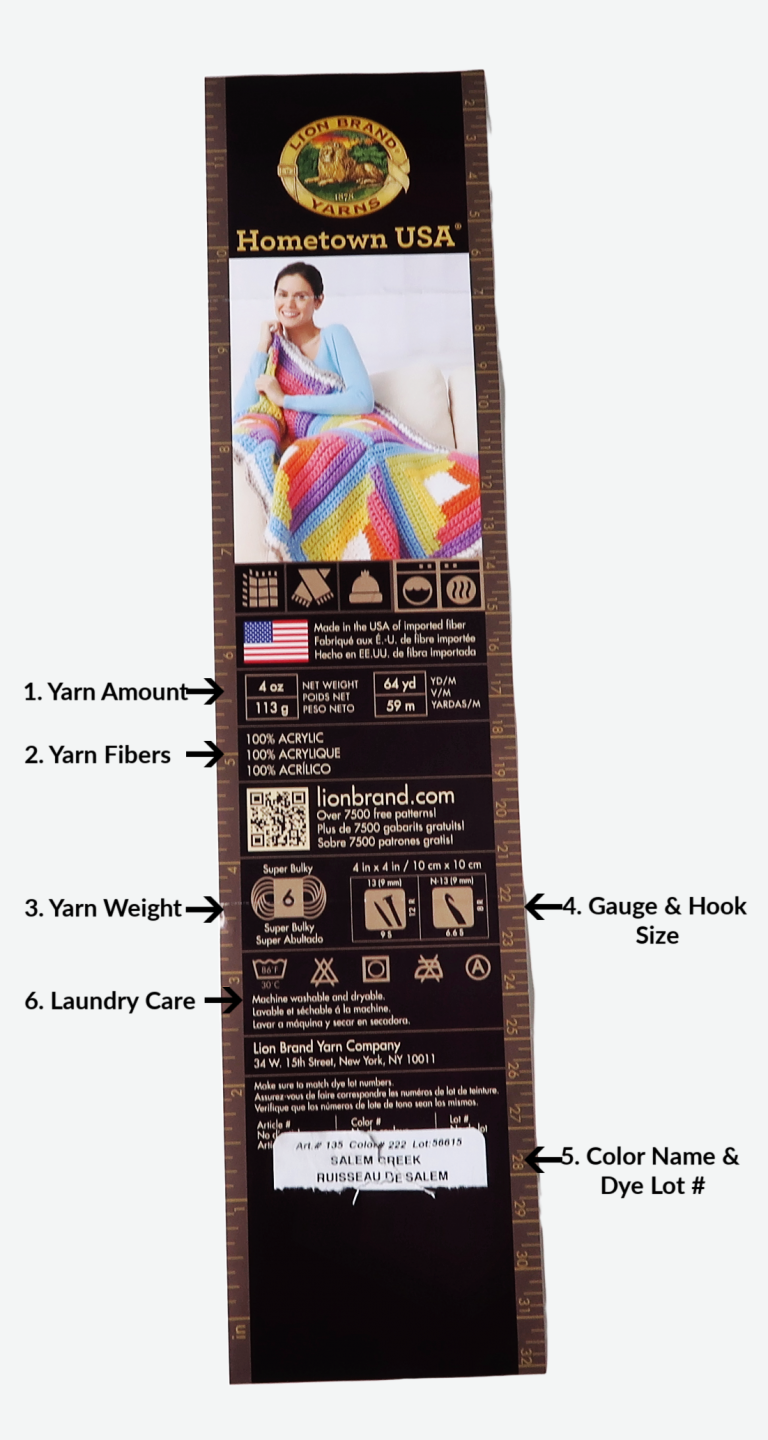
- Amount of Yarn: This part of the label tells you how much yarn you are getting in the skein. This yarn weighs 4 oz. and is 64 yards long.
- Yarn Fibers: In this section, we can see this yarn is 100% Acrylic. Labels give information in English, French, and Spanish.
- Yarn Weight: Yarn weight refers to the thickness of the yarn. This yarn is Super Bulky. All Super Bulky yarn will be a number 6.
- Hook & Gauge: In these two boxes, you will find hook size recommendations and gauge information. The first box is for knitting. The second box is for crochet. On this label, it says to work a 4 x 4″ square with an N – 9 mm hook. The square should have eight rows with six single crochets stitches in each row.
- Color & Dye Lot: The color name of this yarn is Salem Creek, and the lot number is 55683. The lot number is essential because the yarn is dyed in batches. Each batch can have small variations, a bit lighter or darker. If your project requires more than one skein of yarn, make sure the lot number is the same. If the lot number is the same, your yarn will be the same color.
- Laundry Care: These symbols explain how to wash this yarn.
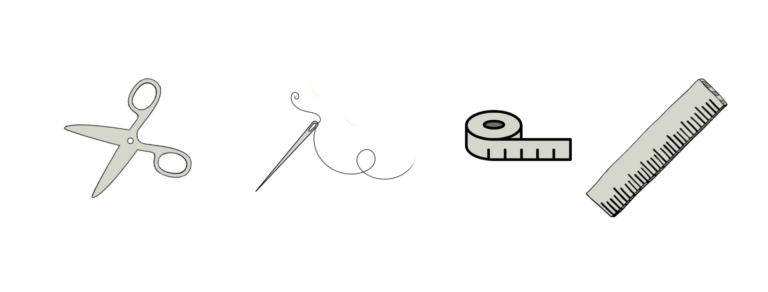
Accessories
When it comes to crochet, there are so many things on the market that you may eventually want to purchase. The truth is to get started; you need a hook, some yarn, and these three accessories.
- Yarn Needle – You will use a yarn needle to sew in your ends and finish your crochet projects. Yarn needles have a larger eye, to make it easier to thread.
- Scissors – The best scissors are small that come to a sharp point for snipping yarn ends. I like embroidery scissors; they work great!
- Measuring Tape/Ruler – A measuring tape comes in handy for measuring gauge.
Terminology
Once you have learned the basic crochet stitches, you’ll want to start your first pattern. For a beginner, crochet patterns may look like they are written in a foreign language.
Crochet patterns are written using many abbreviations, which save space and make the pattern easier to read. Some patterns have diagrams made with symbols of each stitch.
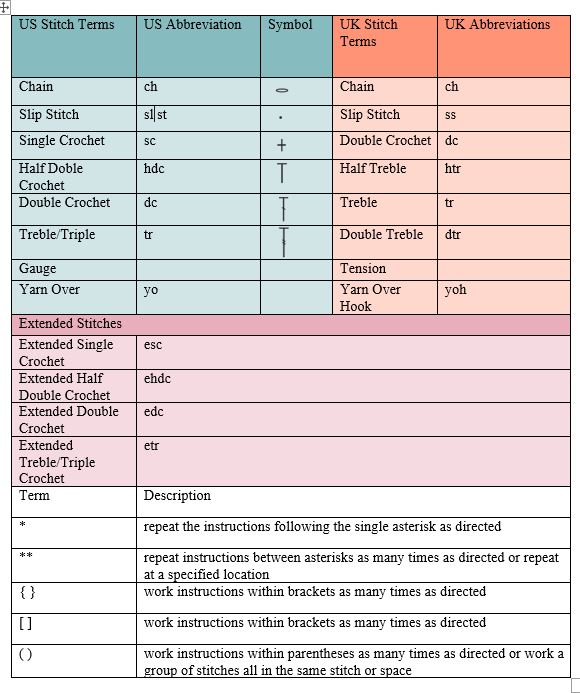
The first thing you need to do is become familiar with the basic stitch terms, abbreviations, and symbols.
There are US and UK terms. Everything you learn in this course will be in US terms, but I will show you the UK terms in the graph below. It is good to know both in case you ever find a pattern you want to make in UK terms.
Reading a Written Pattern
A crochet pattern may be worked in rows or in the round.
Before you start working, the pattern, make a slip knot on your hook. Most patterns assume that you know to do this and don’t include it in the instructions. With the slip knot on your hook, you will make a specified length chain, which the pattern will state. The number of chains you need may be noted before the first row or in the first row, depending on the pattern writer. Here are two examples:
Row 1: Ch 29; sc in 2nd ch from hook and in each ch across
or
Ch 29
Row 1: Sc in 2nd ch from hook and in each ch across
These mean the same thing: Make a slip knot on your hook, then make 29 chain stitches. Now you have 29 chains, and the pattern says to “sc in 2nd ch from hook and in each ch across”. That means that you look at your chain, count the first chain away from the hook, which you will skip, then work a single crochet in the 2nd chain away from the hook. Then, work the single crochet in each of the remaining 27 chains.
You have now completed Row 1. Count your stitches; you should have 28 single crochet stitches.
TIP: Count the stitches at the end of every row.
Most patterns tell you how many stitches you should have at the end of each row.
Row1: sc in 2nd ch from hook and in each ch across. (28)
This is to show the number of stitches you should have. Don’t confuse it with an instruction to do something.
Now you have completed Row 1. Look at your pattern: at the end of the row, it may say ch 1, turn. That means it is time to turn the work so you can make the next row of stitches. The chain 1 makes the yarn high enough to begin the next row. Some patterns don’t tell you to ch 1, turn, at the end of the row. They put that in the instructions for the next row; the pattern could be written in two different ways:
Row 1: Sc in 2nd ch from hook and in each rem ch; ch 1, turn
Row 2: Sc in each sc across
or
Row 1: Sc in 2nd ch from hook and in each rem ch
Row 2: Ch 1, turn; sc in each sc across
It doesn’t matter whether you work the ch 1, turn, at the end of the first row, or the beginning of the next row. Just do it the way the pattern instructions state.
Parentheses, Asterisks, and Brackets
In addition to using abbreviations, crochet patterns use several symbols to tell you what to do. Crochet patterns often have a series of steps that are repeated several times across a row. Instead of writing these out time after time, asterisks (*) are used to indicate the repeats. A pattern might read like this:
Row 3: sc in next 2 sts; *ch 1, skip next st, sc in next st; rep from * across row (or to end)
That means that the steps following the asterisk are to be repeated, in order, until you reach the end of the row. Or the pattern might say:
Row 3: sc in next 2 sts; *ch 1, skip next st, sc in next st*, rep from * to * across row (or repeat between *’s)
That is just another way of saying the same thing, and you work the steps given between the two asterisks, in order, across the row. To make things more complicated — sometimes you will repeat steps several times within a row, and then end up doing something else! That can mean you will find ** within the *.
A pattern might read:
Row 3: dc in next 4 sts; *ch 1, skip next st, dc in next st,** work a shell in next st; rep from * across row, ending last rep at **
First, ignore that ** until the pattern tells you to do something with it. So you will first work the steps following the asterisk across the row, and the last time you will end at the **, meaning you will not work the shell the last time.
Brackets [ ] also are used to tell you how many times to work a specific step. The number immediately following the brackets tells you how many times to do the step. For example:
Row 4: dc in next 4 dc, ch 1, [sk next dc, shell in next dc] 4 times, ch 1, dc in next 4 dc
That means you will work the [sk next dc, shell in next dc] 4 times before working the ch 1, dc in next 4 dc.
Parentheses are sometimes used in the same way. Parentheses are used to indicate a group of stitches that are to be worked together into a stitch, such as: in next dc work (2 dc, ch 3, 2 dc). That means you will work all of those stitches in one dc, which makes a shell.
Working in Spaces
One instruction that can get confusing for beginners is “ work a shell in next ch sp.” A chain space occurs when you work a chain stitch, then skip a stitch, then work into the next stitch. The space underneath the chain, where you skipped a stitch, is where you will work the shell.
Working in the Round
Many crochet projects include working in rounds – such as a granny square.
Instructions may read: ch 4, join with a slip stitch to form a ring.
To do this, you will make a slip knot on the hook, as usual, then chain 4, then insert the hook into the first chain made, hook the yarn and draw it through the first chain and the loop on the hook. Now you have a small circle or ring into which you will work stitches. To start, you will need to raise the yarn to the correct height with chains, just as you would start a row. Then you will work stitches into the ring. Your pattern will tell you what to work into the ring.
Tension and Gauge
I’m giving you this information now because I want you to understand what it is. Please don’t get overwhelmed with it. At the beginning of learning how to crochet, it is more important to get comfortable with each beginner stitch before worrying too much about your tension and gauge. I will go more into detail about tension and gauge further along in these lessons.
Tension
Tension refers to how tight or loose you work crochet stitches.
Most beginners will use a tension that is either too tight or too loose. The good news is that practice will solve most tension issues, so the first step is to practice those beginner stitches. Your tension will improve with time.
Gauge
Gauge is a measurement of your tension.
What Does Gauge Mean?
The term gauge means the number of stitches and rows in a measured area to ensure your crocheted piece will be the correct size when completed.
Gauge is typically measured by how many stitches (horizontal) and rows (vertical) fit in a 4-inch square space.
Why is Gauge Important in Crochet?
Not every crochet project will require you to match the gauge. If you are working on something like a washcloth, it does not matter if it’s an inch or two off. If you are making a garment, such as a sweater or a beanie, it is crucial to match the gauge to fit correctly.
Everyone crochets with a different amount of tension. Some crochet very tight, which would mean your crochet project could be too small. While others crochet much looser, leading to finished projects that are too big. Gauge is important to ensure your finished crochet projects are the correct size.
Right (RS) and Wrong Side (WS) of the Crochet Piece
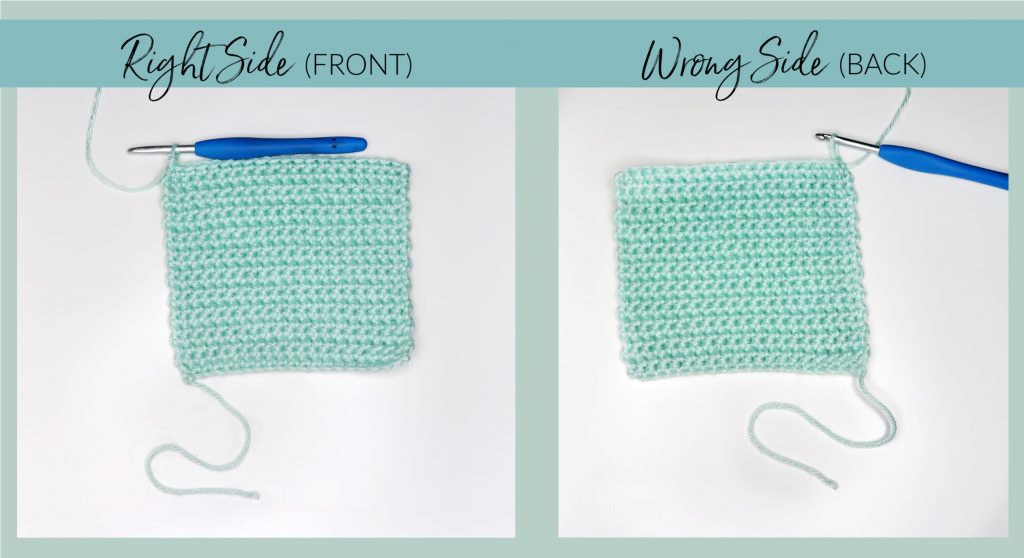
Sometimes a pattern will state to have the Right (front) or the Wrong (back) side facing.
How can you tell the difference from the front or the back of your crochet project?
Right-Hand Crocheters: The front of the piece will have the tail from the foundation chain on the left. When looking at the back the tail will be to the right.
Left-Hand Crocheters: The opposite applies for you, if your looking at the front of your work the tail will be on the right. Looking at the back of the work the tail will be on the left side of the work.
Now that you completed the basics and have purchased supplies you’re ready for the next lesson.
Next Lesson – Essential Skills