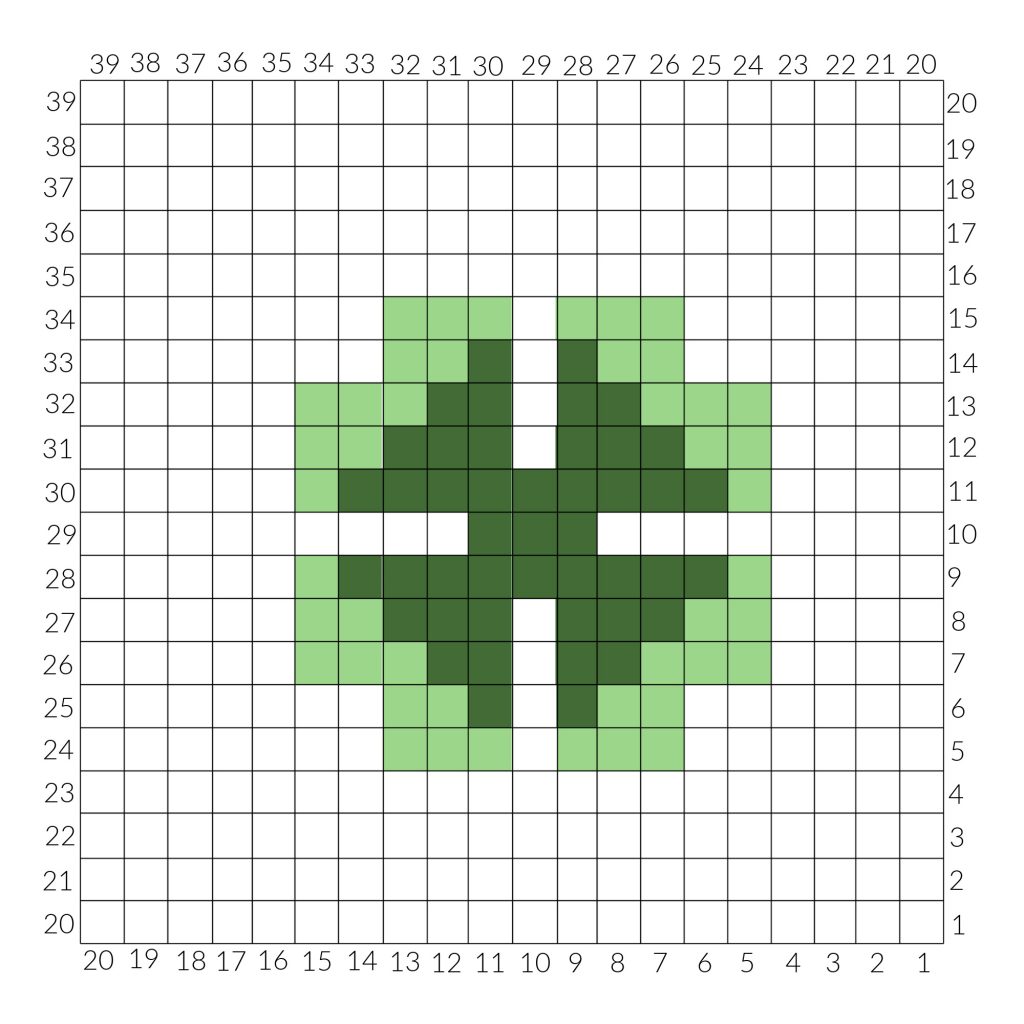
Clover Crochet Pillow

Clover Crochet Pillow

This clover crochet pillow is made using the corner to corner stitch. This pillow will fill your home with the luck of the Irish this St. Patrick’s Day.
 
Need help with the corner to corner stitch? Click Here!


Clover Crochet Pattern

Materials
*This post contains affiliate links, which means I receive a small commission, at no extra cost to you, if you make a purchase using a link.

Sizing

  • Measurements: 18″x 18″
  • Gauge: 6 blocks by 6 blocks = 4”x4”

Pattern Key

  • WS – Wrong Side
  • RS – Right Side
  • ch – Chain
  • slst – Slip Stitch
  • sc – Single Crochet
  • hdc – Half Double Crochet
  • st/sts – Stitch/Stitches

Specialty Stitching

• Picot Cluster
(sc, hdc, sm picot, hdc, lg picot, hdc, sm picot, sc) in the same stitch

• sm picot – Small Picot
ch3, slip stitch in first ch.

• lg picot – Large Picot
ch4, slip stitch in first ch.


Experience Level

  • Intermediate

Special Pattern Notes:

  1. You will use the C2C stitch with the double crochet (dc), working the square on the diagonal starting from bottom right corner to top left.
  2. The even rows will be worked on the right side of work.
  3. The uneven rows will be on the wrong side of work.
  4. On the graphic you will read the even rows from top to bottom and the uneven rows from bottom to top.
  5. The first color changes happens in the 11th row, an uneven row.
Clover Crochet Pillow

Yarn Colors

Clover Crochet Pillow Pattern Instructions

Row 1: [WS] ow

2: [RS] (ow) x2

3: [WS] (ow) x3

4: [RS] (ow) x4

5: [WS] (ow) x5

6: [RS] (ow) x6

7: [WS] (ow) x7

8: [RS] (ow) x8

9: [WS] (ow) x9

10: [RS] (ow) x10

11: [WS] (ow) x4, pi, ow, pi, (ow) x4

12: [RS] (ow) x4, (pi) x4, (ow) x4

13: [WS] (ow) x4, (pi) x5, (ow) x4

14: [RS] (ow) x5, (ds) x4, (ow) x5

15: [WS] (ow) x4, pi, ow, (ds) x3, ow, pi, (ow) x4

16: [RS] (ow) x4, pi, ds, ow, (ds) x2, ow, ds, pi, (ow) x4

17: [WS] (ow) x4, (pi) x2, ds, ow, ds. ow, ds, (pi) x2, (ow) x4

18: [RS] (ow) x5, pi, (ds) x6, pi, (ow) x5

19: [WS] (ow) x6, pi, (ds) x5, pi, (ow) x6

20: [RS] (ow) x6, pi, (ds) x6, pi, (ow) x6

Corner – start decreasing!

21: [WS] (ow) x5, (pi) x2, ds, ow, ds, ow, ds, (pi) x2, (ow) x5

22: [RS] (ow) x5, pi, ds, ow, (ds) x2, ow, ds, pi, (ow) x5

23: [WS] (ow) x5, pi, ow, (ds) x3, ow, pi, (ow) x5

24: [RS] (ow) x6, (ds) x4, (ow) x6

25: [WS] (ow) x5, (pi) x5, (ow) x5

26: [RS] (ow) x5, (pi) x4, (ow) x5

27: [WS] (ow) x5, pi, ow, pi, (ow) x5

28: [RS] (ow) x12

29: [WS] (ow) x11

30: [RS] (ow) x10

31: [WS] (ow) x9

32: [RS] (ow) x8

33: [WS] (ow) x7

34: [RS] (ow) x6

35: [WS] (ow) x5

36: [RS] (ow) x4

37: [WS] (ow) x3

38: [RS] (ow) x2

39: [WS] ow

Fasten off and weave in ends.

Steam

With Dark Sage, Chain 40 fasten off leaving long tail to sew stem on to pillow.

Pin on pillow, then stitch it on using tail.

Pillow Back

Make second c2c square in solid Off White.

Rows 1 – 20: Increase rows

Rows 21 – 39: Decrease rows

Fasten off and weave in ends.

Finishing Notes:

Edging

Edge in Dark Sage (ds) on both squares of pillow.

Row 1: Evenly place sc crochet stitches around each side of the square.

Row 2: sc in each stitch around with 2 sc sts in each corner. Join with a slst, fasten off and weave in ends.

Assembly

With wrong sides facing each other, attach (ds) yarn to any corner and sc the back loops of each stitch around three sides, insert the pillow form and continue sc in back loops of each stitch to close pillow.

Fasten off and weave in ends.

Border

Attach Pistachio (pi) to any corner, ch1, work * Picot Cluster in same stitch, sc in the next 5sts * repeat from * around pillow, join with a slst, fasten off and weave in ends.

Clover Crochet Pillow

I know your going to love this Clover Pillow. If you have any questions, don’t hesitate to ask. 

You can find Printable PDF for this pattern in my Etsy shop.

Leave a Comment

Your email address will not be published. Required fields are marked *

Pinterest
fb-share-icon